Table of Contents
ToggleA disorganized pantry is a productivity killer. When you can’t find the pasta, cereal ends up stale, and you buy duplicates of what you already have, money and time disappear. Pantry storage bins are the straightforward solution to this chaos. They keep dry goods fresh longer, make inventory easy to track, and transform a jumbled shelf into a clean, functional space. Whether you’re starting from scratch or upgrading an outdated system, choosing the right bins and organizing them properly can elevate your entire kitchen workflow. This guide walks you through selecting, setting up, and maintaining pantry storage bins that actually work for your household.
Key Takeaways
- Pantry storage bins preserve dry goods longer, reduce food waste, and save money by keeping items fresh and pest-free in sealed containers.
- Clear plastic bins are the most affordable and practical choice for everyday pantry storage bins, while glass offers premium durability and aesthetic appeal at a higher cost.
- Organize bins by category and frequency of use, placing daily items at eye level and labeling everything with contents and purchase dates to prevent waste and impulse buying.
- Measure your pantry space carefully before purchasing containers, accounting for shelf dimensions and household shopping habits to ensure a functional system that fits your lifestyle.
- A hybrid approach using both plastic and glass containers—glass for frequently accessed staples and plastic for backup supplies—balances cost, durability, and visual appeal.
- Monthly maintenance including stock rotation, seal checks, and label updates keeps your pantry organized and prevents the gradual return to clutter.
Why Pantry Storage Bins Matter for Your Kitchen
Pantry storage bins do more than look neat, they extend shelf life, reduce food waste, and save money over time. Dry goods like flour, sugar, cereal, and pasta absorb moisture and odors when left in opened packages. Sealed containers keep them fresh and pest-free, which means fewer replacements and less waste.
Beyond preservation, bins make your pantry scannable at a glance. You can spot what you have without pulling boxes off shelves or squinting at faded labels. This visibility cuts down on impulse buying and forgotten ingredients buried in the back. If you shop multiple times a week or meal plan regularly, the efficiency gain is real.
Finally, bins create visual order. A tidy pantry feels calming and makes meal prep feel intentional rather than chaotic. Most DIYers and homeowners report that organized storage motivates them to cook at home more often, which saves money and supports healthier eating habits. The bins themselves are cheap insurance against disorder.
Types of Pantry Storage Bins to Consider
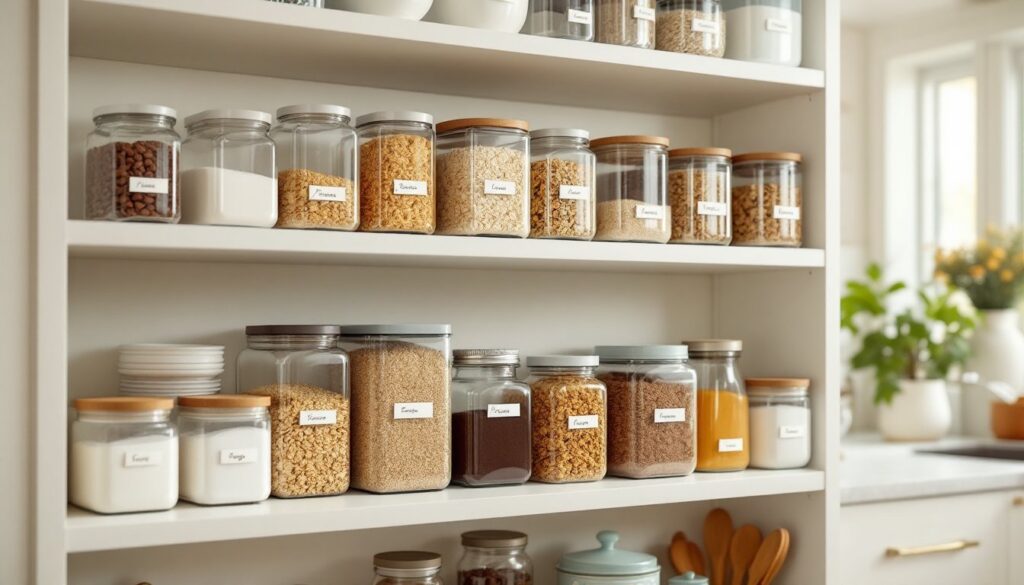
Clear Plastic Containers
Clear plastic bins are the workhorses of pantry organization. They’re affordable, durable, and let you see contents at a glance without opening them. Look for food-grade polypropylene or BPA-free plastic containers with tight-sealing lids that actually create an airtight seal, not just a loose snap fit.
They come in modular sizes: small (roughly 1–2 cups) for spices and small quantities, medium (4–8 cups) for cereals and rice, and large (12+ cups) for flour and sugar. The beauty of a modular system is stacking efficiency. Measure your shelf height before buying: most pantries work well with 2–3 container heights stacked.
Plastic does have limits. It scratches over time and can absorb stains from tomato sauce or turmeric. It’s also not ideal for very long-term storage of oils or nuts, plastic can leach chemicals when exposed to oils for months. For everyday dry goods, though, clear plastic is hard to beat for value and visibility.
Glass and Metal Options
Glass containers are the premium choice. They don’t stain, scratch, or absorb odors, and they’re genuinely airtight when fitted with proper seals. Borosilicate glass (the kind used in lab glassware) won’t shatter from temperature changes, which matters if you store hot pasta or move bins in and out of the fridge.
The downside: glass is heavier, more expensive, and easier to break if you’re pulling bins in and out regularly. Dented metal tins and vintage apothecary-style jars look beautiful on display shelves but often have looser seals than modern plastic or glass.
Many experienced organizers use a hybrid approach: glass or metal for frequently accessed staples (flour, sugar, coffee) kept at eye level, and plastic for backup supplies stored higher up. This balances cost, durability, and aesthetics. Experts testing pantry organizers regularly recommend combining multiple container types rather than standardizing on one.
How to Choose the Right Bins for Your Space
Start with inventory. List everything currently in your pantry, cereals, flours, sugars, grains, pasta, snacks, spices. Categorize by frequency of use (daily, weekly, monthly) and note quantities. A household buying bulk flour might need a 20-cup container, while a single apartment dweller needs half that.
Measure your pantry dimensions carefully. Note shelf width, depth, and height. Account for door swings, shelving hardware, and any items that must stay in place (appliances, cookbooks). Bins should not overstuff shelves or force you to reorganize other items. Leave at least 1–2 inches of clearance for easy access.
Consider your household’s habits. Do you buy in bulk? You’ll want larger containers and a system that accommodates variety. Do you shop frequently at farmer’s markets with smaller quantities? Smaller, stackable bins work better. Do you have kids who grab snacks independently? Wider, lower containers and clear labels are essential.
Finally, think about aesthetics within your budget. Clear plastic is budget-friendly and blends into most kitchens. Matching glass containers create a curated look but cost 3–5 times more. Metal tins with decorative labels split the difference. Your bins will be visible, so choose a style that makes you want to maintain the system. A pantry organized with containers you like looking at stays organized longer.
Organizing and Labeling Your Pantry Bins
Once you’ve selected bins, organization is everything. Start by grouping similar items: grains together, baking ingredients together, snacks in their own section, spices clustered for quick access. Most professional organizers recommend keeping frequently used items at eye level and occasional items higher or lower.
Before filling containers, wipe shelves clean with a damp microfiber cloth. Dust and debris in bins will shorten shelf life and gum up lids. If you’ve had pest issues, consider a light food-safe insecticide spray on shelves before adding bins (follow product directions and ventilate well).
Transfer dry goods completely into bins. Don’t leave half-empty cereal boxes on shelves, they take up space and defeat the purpose. If you buy bulk items in large bags, transfer them into appropriately sized containers. Label everything with a label maker or permanent marker, noting the contents and the date purchased. For dry goods, shelf life varies: flour lasts 6–8 months, sugar and salt indefinitely, oats 1–2 years, rice 4–5 years. Dating items helps you rotate stock and avoid waste.
Arrange bins by category and frequency. Baking basics (flour, sugar, baking powder, vanilla) should be grouped near your mixing area. Breakfast cereals near bowls and milk. Snacks at a level kids can reach. This arrangement cuts prep time and makes pantry restocking intuitive. Use drawer organizers or small bins for spices so they don’t get lost. Group similar spice sizes together for consistent appearance.
For maximum readability, try expert recommendations on testing pantry organizers which emphasize clear labeling and consistent container sizing. Label not just the outside but also include quantity when practical (e.g., “Brown Rice, 5 lbs”). This prevents over-buying and lets household members know when to restock.
Maintain your system monthly. Rotate stock so older items are used first. Wipe down containers and labels. Check seals for cracks or looseness. A 15-minute monthly sweep keeps the pantry functional and prevents the slow slide back into chaos.
Conclusion
Pantry storage bins are a practical investment that pays dividends in saved money, less waste, and a kitchen that runs smoothly. The right containers, whether clear plastic, glass, or a mix, paired with thoughtful organization turn a chaotic pantry into an asset. Start small if you’re new to this, and scale up as your system proves itself. A well-organized pantry doesn’t need renovation or permits: it just needs the right tools and a bit of intentional setup. Your future self will thank you every time you open a door and know exactly what you have.